Linking cost items to BIM model elements (Auto-assign process)
To build a 5D BIM model the classification system must be connected with BIM-model elements. In that way, unit prices are added to individual 3D BIM model elements. This can be done in two different ways. The first way is to automatically connect all cost items together with the corresponding elements of the BIM model. This is enabled by using the Queries defined for each cost item. The other way implies manual linking each individual part of the building with the appropriate cost item.
Check if Automatic connection of cost item and BIM model element is possible
Before executing the Auto-assign process, we recommend checking if the system can automatically link Cost Items with 3D elements (using linking rules defined in queries), calculate their quantities (using cost item formulas) and finally provide their cost by multiplying Unit cost and calculated quantities. To check if auto-assign of specific cost item or cost classification (including respective cost items) is possible use Check Applicable Elements tool. Select a cost or classification item → Check Applicable Elements Assign → choose option All elements to perform analyses of all elements applicable to be assigned to selected cost classification or items, or option Selected elements to analyze if only selected elements can be assigned to respective cost items. Once the process is completed, the system will create a selection set “Check Applicable Elements Results” as a result, and all elements with found issues will be populated into respective selection sets according to the cost classification hierarchy. Finally, the leaf selection sets will have a different name (and contain respective 3D elements) according to possible issues that need to be resolved so that the system can perform auto-assign to all of them. Possible issues that need to be resolved are: No element query defined (no elements will be assigned since cost item doesn’t have query defined), No elements to check (no elements will be assigned since none of the elements passes all rules needed to be linked with cost item) or Missing property: “Property Name” (elements will not be assigned since they don’t have the property defined in the cost item as calculation Formula).
Automatic connection of cost item and BIM model element
After Cost Classification is defined, it can be assigned to BIM model elements automatically following these steps:
Choose a certain classification in the Cost Editor tab within the Classification Editor in BEXEL Manager → Click on the classification folder in the list below → Click Auto Assign in the second toolbar line or click on the classification folder with the right-click and choose the option Auto Assign Cost Items → Further on chose option To New Cost Version or To Active Cost Version (creating new or updating an existing active cost version) → An Auto-assignment information window will show up → Finish the process by clicking OK.
When the Auto-assign process is completed, if some Cost items can’t be assigned to model elements, an information window will show up with the information on the number of assigned items compared to the total cost items. Information about unassigned cost items can be copied to the clipboard for a review.
With this process, elements are linked to the cost database and a 5D BIM model is created.
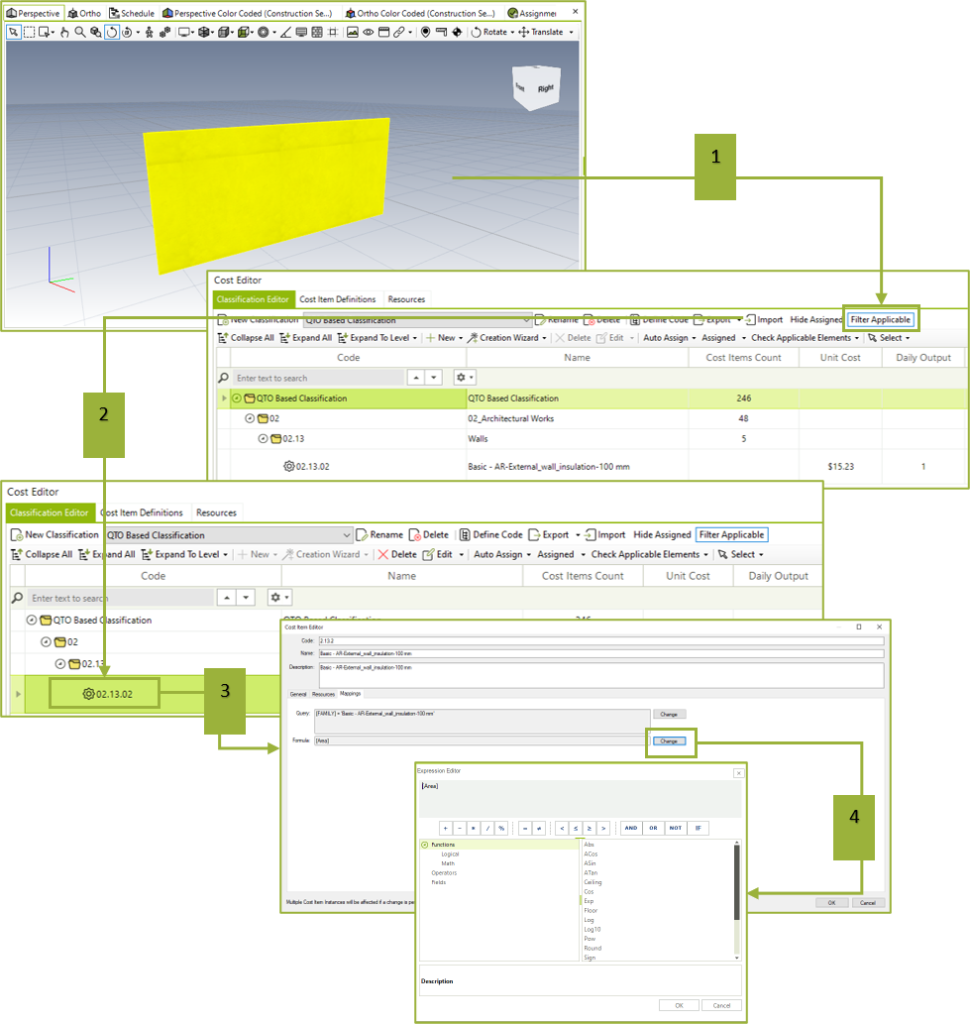
If there are elements that were not assigned to any Cost item, select them, go to the Cost editor window, Classification editor tab → Click Filter applicable → In Cost Editor, all applicable Cost items will be filtered (In this case, problems in the assigned process are not related to Element Query since the program signals that certain Cost items are applicable to unassigned elements, so the most probable cause could be in the Quantity formula) → Right click on the filtered Cost item, select Edit Cost item definition → Check Quantity formula → The quantity formula probably contains a property that the selected element doesn’t have, property in the Quantity formula is not numeric, therefore cannot be used for calculation in a mathematical formula, or simply, a mathematical expression is incorrect.
Another way to check which elements are assigned to a certain Cost item is to click on the Cost item → Click on the Select command in the second toolbar line → Choose the Assigned Elements command → All elements which are assigned to the cost item will be selected, and can be reviewed by isolating selected elements from other elements of the BIM model
Other options to select are Applicable Elements, Applicable Unassigned Elements and Applicable Assigned Elements using the same Select command from the second toolbar line in the Cost Editor tab. For the Applicable Elements command, the BEXEL Manager will select all applicable elements, which include assigned and unassigned. Applicable Unassigned Elements will select all applicable but unassigned elements. For the Applicable Assigned Elements BEXEL Manager will select all applicable and assigned elements, which are the same elements as with the command Select → Assigned Elements. This is very useful to check if all elements that should be assigned to a specific Cost item passed the Assign process.
If you have applicable unassigned elements for certain Cost items after the Auto-Assign process, there is most likely a problem in the Quantity formula as described in the chapter above.
During the early phases of project development, when the BIM model is not fully developed, Cost items could be assigned to spaces with cost parameters defined by square or cubic meters. Such cost approximation allows for project parameters control in the early phases of the project, quick budgeting and cost estimation.
If there are elements that failed the Assign process, but after using the Filter Applicable command, there are no Cost Items applicable to that element, then there must be an error in Element Query that prevents linking of Cost Item and certain elements. It is a most likely error in expression, like wrong typing of family/material/property name, or if you used the command Equal for certain text but in reality, the property or family name has an extension for thickness or type of material that you missed (in this case the best option is to use command Contains instead of Equal to prevent such errors).
The condition for the model element to be assigned to a Certain Cost item is to fulfill conditions of all Element Queries of Classification items in which that Cost item is placed (whole hierarchy) and the Element Query of that Cost item. Suppose an element fails to assign to a certain Cost item. In that case, it is possible that it does not fulfill the requirements of Element Query of some of the Classification Items on a higher hierarchy and not the one of the Cost item.
Connecting individual cost items with a defined element
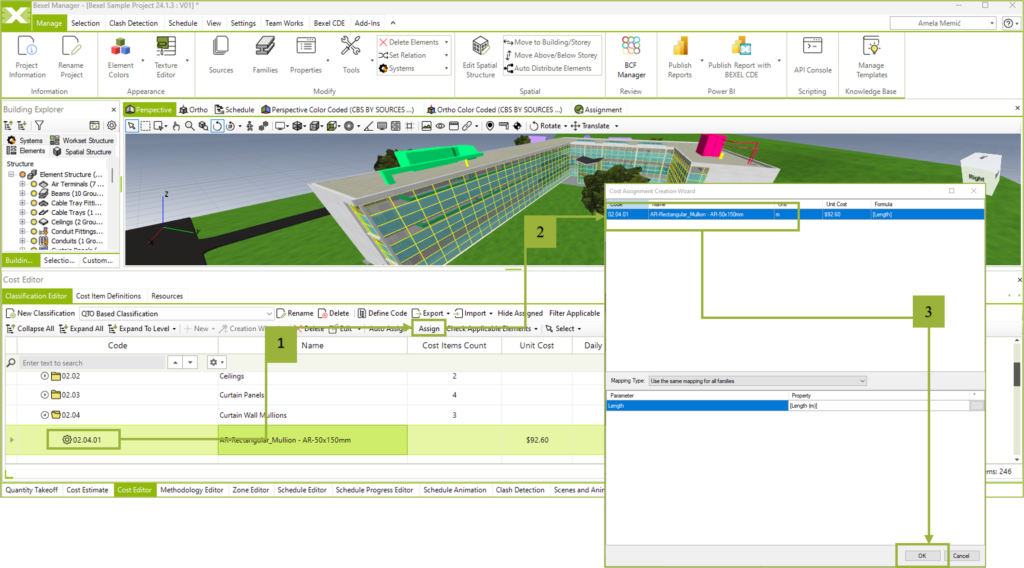
Activate the Cost Editor tab → Select the desired classification system → In the main viewport, select elements to assign to the Cost Item → Click Assigned in the second toolbar line → The Cost Assignment Creation Wizard window will open → Choose the Cost Item from the list to add the selected element → Finish the procedure by clicking OK.


